Making 4 different crust recipes
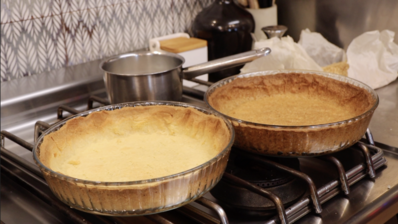
f you’ve ever stood in your kitchen, butter in one hand and flour in the other, wondering why your pie crust sometimes behaves like a stubborn toddler… welcome, friend. Today I’m giving you the four pie crust recipes I rely on every single time I bake—whether I’m making a savoury farm pie for lunch or a sweet tart for the kids after school.
These are the crusts we use here on the farm, taught, tested, and tweaked during long baking days when the kitchen smells like butter and there’s always at least one chef trying to sneak a taste of uncooked dough. Each pastry has its own personality: the rugged basic flaky crust, the richer and sturdier enriched version, the SPECULAAS like sweet flaky pastry perfect for sweet potato pies, and the soft, elegant pâte sucrée that slices like a dream.
If you’re new to pastry, don’t worry—these recipes are truly beginner-friendly. If you’re experienced, consider this a gentle reminder that great crust comes down to two things: very cold butter and very little fussing. Every dough here follows that philosophy, and every one of them will give you a beautiful, reliable result.
In this post, you’ll find all four recipes, each with its own step-by-step instructions, tips, and the little bits of pastry science that actually make a difference. Whether you’re baking something savoury, sweet, rustic, refined, or all of the above… there’s a crust here that will fit your pie perfectly.
Ready to bake? Let’s make your kitchen smell like heaven.



Serves:
4x 9 inch (23 cm) pies (bottom and topped)
Time to Prepare:
15 min each, 30 min minimum chilling

Time to cook or cure:
20- 35 min baking
Skill
Baking

Serves:
4x 9 inch (23 cm) pies (bottom and topped)

Time to Prepare:
20 min each crust

Time to cook or cure:
20-35 min

Skills:
Baking

This Basic Flaky Pastry is your go-to all-rounder crust. It’s fast, beginner-friendly, and intentionally lumpy to create beautiful flakes in the oven.
– 10 oz / 300 g wheat flour
– 1 tsp / 6 g salt
– 7.4 oz / 210 g cold butter
– 5.5 fl oz / 105 g very cold water
– Mixing bowl
– Cheese grater
– Spoon
– Clingfilm or beeswax wrap
– Rolling pin
Butter, bowl, water, countertop.
If your kitchen is warm, pop everything into the fridge for 10 minutes before you start.
This keeps layers intact and prevents tearing.
Quarter turns help keep the dough even.
Too much flour makes the dough dry and tough.
Dust, don’t pour.
Cold dough + hot oven = steam pockets = flakes.
Aim for 200–220°C / 392–428°F for the first bake.
Lumpy, uneven, messy pastry? Perfect.
The oven is where the magic happens — not the counter.
Start by combining your dry ingredients.
Add the flour and salt to a large mixing bowl and give them a quick stir with your hand or a spoon so everything is evenly distributed. This tiny step helps prevent salty pockets later and sets you up for a well-balanced dough.
Grate in the cold butter.
Take your cold block of butter (extra points if you popped it into the freezer for 5–10 minutes first), lightly dust it with flour so it doesn’t stick to your fingers, and grate it straight into the bowl using the coarse side of your cheese grater. Try to work quickly here — the colder the butter stays, the flakier your final crust will be.
Gently toss the mixture to coat the butter shreds.
Use your fingertips or a spoon to lift and drop the mixture a few times, making sure every little strand of butter gets a kiss of flour. Don’t rub or massage — think “loose and fluffy,” not “knead and squeeze.” The goal is to keep distinct pieces of butter throughout the dough.
Add the cold water and bring the dough together.
Pour in the cold water (again, colder = better), and use a spoon — not your warm hands — to gather the mixture into a shaggy mass. It won’t look smooth, and that’s perfect. Stir just until the dough begins to clump together, and leave any dry bits at the bottom alone for now. They’ll blend in during shaping.
Shape the dough into a rough disk and chill it.
Tip the contents of your bowl onto your work surface and gently press everything together into a flat, round disk. No kneading, no fussing, no trying to make it look perfect. Wrap the disk tightly in clingfilm or beeswax wrap and let it rest in the fridge for at least 30 minutes. This chill time firms up the butter and relaxes the gluten, making rolling much easier.
Roll the dough to 0.2 inch / 0.5 cm thickness.
Once rested, unwrap the dough and place it on a lightly floured surface. Roll from the centre outward, turning the dough a quarter turn every few strokes to keep it even. Aim for about 0.2 inch (0.5 cm) thickness. The dough will look a little lumpy and marbled — that’s exactly what will turn into beautiful flakes in the oven.
Refrigerator:
Wrap the dough tightly in clingfilm or beeswax wrap.
Store in the coldest part of your fridge.
Good for 3 days.
If it starts to crack when rolling, let it warm up on the counter for 5 minutes.
Freezer:
Wrap well, then place in a freezer-safe container or bag to prevent freezer burn.
Good for up to 2 months.
Thaw overnight in the fridge before using.
Rolled-out crust (unbaked) storage:
Line your pie dish, prick the bottom, and cover fully.
Refrigerate for up to 24 hours, or freeze up to 2 months (bake directly from frozen).
Blind-baked crust storage:
Store fully cooled crusts in an airtight container.
Keeps 2–3 days at room temperature or 5 days refrigerated.
Refresh in a 180°C / 356°F oven for 5 minutes to re-crisp.
Because it’s too cold. Cold butter is good, frozen dough is not.
Let your dough rest on the counter for 3–5 minutes, then try again. It should still be cool, just slightly more pliable.
That’s usually caused by overworking the dough or skipping the chilling step after lining the tin.
Once you place the dough into your pie dish, chill for at least 20 minutes before baking — it relaxes the gluten and keeps your edges tall.
Two reasons:
too much handling
too much water
Remember: shaggy and messy beats smooth and perfect.
Smooth dough = gluten = toughness.
You can, but the result will be denser and less flaky. If you want flavour + flakes, replace 20–30% of your flour with whole wheat, not all of it.
Absolutely. Cut the butter into tiny cubes, freeze them, and quickly rub them into the flour with your fingertips.
But… the grater method gives the most reliable flakes with the least fuss, especially for beginners.
This enriched pastry uses an egg for structure, elasticity, and richness, creating a dough that’s easier to roll and beautifully golden.
– 10 oz / 300 g wheat flour
– 1 tsp / 6 g salt
– 7.4 oz / 210 g cold butter
– 1 large egg
– 2.5 fl oz / 55 g cold water
– Mixing bowl
– Cheese grater
– Spoon
– Clingfilm or beeswax wrap
– Rolling pin
Egg dough softens faster than eggless pastry, so handle it quickly. If it starts to feel sticky or warm, give it 5–10 minutes in the fridge before continuing. Cold butter = steam pockets = flaky layers.
A high initial temperature (200–220°C / 392–428°F) helps the butter burst into steam and lift those layers apart. After the first 10–15 minutes, you can lower the temperature if needed, depending on your filling.
Once the dough is in the pie dish, pop it back into the fridge for at least 20 minutes.
This prevents shrinking and helps the edges hold their shape.
Gently lift and lower it into place instead. Any stretch you create now will shrink back in the oven — pie dough has the memory of an elephant.
A dusting is enough. Too much flour will dry out the dough and toughen the edges.
Because the dough already contains egg, brushing the top with a little beaten egg or cream before baking creates a deeply golden finish that looks beautifully professional.
A few slits in the top allow steam to escape. This prevents bubbling, cracking, and soggy patches—especially with juicy fillings.
Fill the crust all the way to the top edge with baking beans or rice.
This keeps the sides from collapsing and ensures an evenly cooked bottom.
A screaming-hot crust can curdle eggy fillings or cause the bottom to go soggy.
Warm is perfect. Hot is not.
Flaky pastry is supposed to look a bit patchy and imperfect before baking. The oven transforms it. Trust the process.
Combine the dry ingredients.
Pour the flour and salt into a large mixing bowl and give them a quick stir so the salt disperses evenly. This simple moment sets the foundation for a beautifully balanced dough.
Grate the cold butter directly into the bowl.
Take your cold block of butter (bonus points if it spent a few minutes in the freezer first), dust it lightly with flour, and grate it straight into the flour using the coarse side of a cheese grater. Try to keep a steady pace — the goal is to keep the butter as cold as possible so it stays in tiny, distinct shreds.
Toss everything together with a light hand.
Use your fingertips or a spoon to gently lift and drop the mixture, coating every small piece of butter with flour. You’re not rubbing or kneading here — just loosening and mixing so you keep all those future flaky layers intact.
Whisk the egg with the cold water.
In a small bowl or cup, crack your egg and whisk it with the cold water until completely smooth. This little mixture enriches the dough, giving it strength and beautiful colour while helping everything hold together.
Add the egg mixture to the bowl and bring the dough together.
Pour the whisked egg and water over the flour–butter mixture. Use a spoon (not your warm hands yet!) to gently pull everything together into a soft, shaggy dough. Don’t aim for perfection — just mix until you no longer see dry flour clinging to the bottom of the bowl.
Shape, wrap, and chill.
Turn the dough out onto your work surface and gently press it into a thick, round disk. Try not to knead — simply gather and press. Wrap the disk tightly in clingfilm or beeswax wrap and refrigerate it for at least 30 minutes. This resting time chills the butter and relaxes the gluten, giving you a dough that rolls out smoothly and bakes into beautiful, structured flakes.
Wrap the dough tightly in clingfilm or beeswax wrap so no air can reach it.
Store it in the coldest part of your fridge.
Keeps well for 2–3 days.
If the dough feels too firm when you take it out, let it rest on the counter for 5–7 minutes before rolling. Egg-enriched dough stiffens more when cold than eggless dough.
Wrap the dough tightly, then place it inside a freezer-safe bag or container.
Flatten it before freezing — disks thaw more evenly than balls.
Keeps for up to 2 months.
Thaw overnight in the fridge before using.
If it cracks slightly around the edges during rolling (normal after freezing), just patch it gently with your fingertips.
Line your pie dish, trim or tuck the edges, and prick the bottom with a fork.
Wrap well and refrigerate for up to 24 hours.
For longer storage, freeze the lined pie dish (double-wrapped) and bake from frozen.
When baking from frozen, add 3–5 minutes to your blind-bake time.
Because this dough contains egg, blind-baked crusts stay beautifully crisp once cooled.
Cool completely before storing.
Keep in an airtight container at room temperature for up to 2 days.
Or refrigerate for up to 4–5 days.
Re-crisp in a 180°C / 350°F oven for 5 minutes before filling if needed.
A: You can do either. Peeling before boiling speeds up post-cooking prep but may cause color to bleed. Boiling with the skin on and peeling afterward helps retain flavor and color.
A: It depends on their size. Small beets take about 20–30 minutes, medium 30–40 minutes, and large ones up to 50 minutes. Test with a knife—it should go in easily.
A: Yes, but it’s best used in savory broths or composted. It contains nutrients and a beautiful color but may have a strong earthy taste.
A: Boiled beets are perfect in salads, borscht (beet soup), purées, smoothies, or pickled for preserving.
A: Add a splash of vinegar or lemon juice to the boiling water to help preserve their vibrant hue.
A: Boiling may cause some loss of water-soluble nutrients, but beets remain a very healthy option in any form. Steaming retains the most nutrients, followed by roasting and then boiling.
– 10 oz / 300 g flour
– 1 tsp / 6 g salt
– 7.4 oz / 210 g cold butter
– 5.1 oz / 130 g dark unrefined cane sugar
– 1 large egg
– 10 oz / 300 g flour
– 1 tsp / 6 g salt
– 7.4 oz / 210 g cold butter
– 5.1 oz / 130 g dark unrefined cane sugar
– 1 large egg
– Mixing bowl
– Cheese grater
– Spoon
– Clingfilm or beeswax wrap
– Rolling pin
Sugar softens dough quickly, so give it a chill after mixing AND after lining the pie tin.
Bake the shell at no more than 180°C / 350°F to avoid burnt edges, especially without a fan.
This prevents sides from sinking — sweet pastry is naturally softer.
Water turns sweet pastry gummy. A tiny tear of raw dough works like glue.
Sugar caramelizes quickly. If you see darkening too early, cover the edges with foil or a pie shield.
Start by combining your dry ingredients.
Add the flour, salt, and unrefined cane sugar to a large mixing bowl. Give everything a gentle stir with your hand or a spoon so the salt and sugar disperse evenly. If the sugar is a little lumpy (totally normal with unrefined sugars), break it up now or sift it for an extra-smooth dough.
Grate the cold butter directly into the flour mixture.
Lightly coat your cold block of butter with a little flour so it doesn’t slip through your fingers. Use the coarse side of your cheese grater and grate it straight into the bowl. Work quickly — the colder the butter stays, the better your flakes will be. This dough is sweet, but the technique is the same: cold butter equals crispy, layered magic.
Gently toss everything together to coat the butter.
Use your fingertips or a spoon to lightly lift, fluff, and toss the mixture. Every little shred of butter should get coated in flour and sugar. Resist the urge to rub or squeeze the butter into the flour — you want those separate pieces to remain visible.
Add the egg and bring the dough together.
Crack your egg into a small bowl and whisk it lightly, just enough to break it up. Pour it over your flour–butter mixture. Using a spoon (not your warm hands yet!), stir and fold until the mixture starts coming together in soft, clumpy chunks. It won’t form a smooth dough — sweet pastry is naturally more crumbly at this stage.
If the dough is still too dry, add a tiny splash of cold water.
Start with just 1 teaspoon at a time. Sweet pastry should be soft and pliable, but never wet. You’re looking for a dough that holds together when gently pressed, not one that sticks to your fingers.
Turn the dough onto the counter and gently shape it.
Tip the mixture onto your work surface and gather it into a loose mound. Gently press it together into a flat disk. No kneading, no massaging — think of it as scooping it into one piece rather than working it. Overworking sweet pastry makes it tough, not tender.
Wrap and chill.
Wrap your disk tightly in clingfilm or beeswax wrap. Chill the dough for at least 30 minutes.
This resting time allows:
the butter to firm back up
the gluten to relax
the sugar to hydrate the dough
All of which make the pastry easier to roll and beautifully crisp once baked.
Wrap the dough tightly in clingfilm or beeswax wrap.
Sweet dough dries out faster than savoury pastry because of the sugar, so make sure the wrap is well-sealed.
Store up to 2–3 days.
If it gets crumbly after chilling, let it rest on the counter for 3–5 minutes before rolling.
Wrap tightly, label, and store in a freezer-safe container or bag.
The sugar helps protect the dough, so it freezes beautifully for up to:
2 months
Thaw overnight in the fridge for best results.
Line the pie dish, prick the base, and wrap well.
Refrigerate up to 24 hours.
OR freeze for up to 2 months.
Bake directly from frozen — just add a few extra minutes to your blind-bake.
Let it cool fully before storing.
Keep at room temperature in an airtight container for 2 days, or chilled for 4–5 days.
Re-crisp in a 180°C / 350°F oven for 5 minutes before filling.
Because of the unrefined cane sugar. Sugar draws moisture out of the dough, making it more delicate.
Don’t worry — it comes together beautifully once chilled. If it’s too crumbly, add 1–2 teaspoons of cold water.
Technically yes, but it will taste lightly sweet and caramel-like.
Best for fruit pies, tarts, galettes, and anything that appreciates a sweeter, crispier finish.
Sweet dough browns faster because of the sugar.
Lower your oven temperature, avoid fan mode, and tent the edges with foil if needed.
It adds a richer flavour (caramel, toffee, molasses notes) and keeps the crust naturally sweet without using processed white sugar.
It also gives the pastry its beautiful golden colour.
It was too cold — sweet dough firms up quicker than egg dough or basic flaky pastry.
Let it warm up for 3–5 minutes on the counter and try again.
If cracks persist, gently press them together; this pastry is forgiving once it warms slightly.
Pâte sucrée is the gentlest, most elegant of all pie doughs — the kind of pastry that bakes into a soft, delicate shell with a tender crumb and a subtle sweetness that doesn’t try to steal the show. Unlike flaky pastry, which relies on cold butter and steam for drama, pâte sucrée is all about softness and finesse. The butter is creamed, not grated, giving you a smooth, biscuit-like crust that slices beautifully and never shatters.
– 10 oz / 300 g flour
– 1 tsp / 6 g salt
– 7.4 oz / 210 g cold butter
– 5.1 oz / 130 g powder sugar
– 1 large egg
– Mixing bowl
– Cheese grater
– Spoon
– Clingfilm or beeswax wrap
– Rolling pin
Pâte sucrée needs to be chilled, but if it’s too firm when you start rolling, it will crack.
Let it sit on the counter for 3–5 minutes so it becomes pliable but still cool to the touch.
A little softness here actually helps — this pastry is meant to feel like clay, not stone.
This dough is much softer than flaky pastry.
Use slow, gentle rolls from the centre outward, rotating the dough every few strokes.
If you rush or press too hard, you’ll stretch it. And stretched pâte sucrée always shrinks back in the oven.
This is the secret to neat, elegant edges. Once the dough is in the tin, let it chill for 20–30 minutes before baking.
Soft sweet dough collapses easily; cold dough holds its shape like a dream.
Pâte sucrée burns quicker than flaky pastry because of the sugar.
Keep the temperature around 180°C / 350°F (no fan) so you get soft, golden edges rather than dark, bitter ones.
Because this dough is tender, it needs full support during blind baking.
Fill the crust all the way to the rim — this keeps the sides tall and smooth instead of slipping down the tin.
If the dough cracks during rolling or blind baking, press a tiny piece of raw dough into the gap and smooth it with your fingertip.
Water makes sweet pastry gummy; raw dough creates a seamless repair.
Creams, curds, chocolate ganache, or fresh fruit tarts all need a crisp, fully baked shell.
Add 5+ minutes after removing the weights for a sturdy, biscuit-like finish.
Warm pâte sucrée + cold custard or cream filling = soggy bottom.
A fully cooled shell ensures a crisp bite and cleaner slices.
Start by preparing your mixing bowl.
Add the soft, room-temperature butter to a large bowl. It should be pliable but not greasy or melted — think “spreadable on bread straight from a warm cottage windowsill.” Soft butter is essential here because pâte sucrée relies on creaming, not flakiness.
Cream the butter with the powdered sugar until light and fluffy.
Sprinkle the dark powdered sugar over the butter. Using a whisk, wooden spoon, or hand mixer, beat the two together until the mixture turns pale, creamy, and slightly whipped.
This step is what gives pâte sucrée its signature delicate, biscuit-like texture. Take a minute here — the more air you create now, the more tender your final crust will be.
Add the egg and whisk it in thoroughly.
Crack in the egg and whisk again until the mixture turns silky and fully combined. At this point, it should look like a soft, sweet buttercream. If the mixture looks slightly curdled at first, don’t worry — just keep whisking and it will turn smooth.
Sprinkle the flour and salt evenly over the mixture.
Use a sieve if you want an ultra-smooth pastry, especially if your flour or powdered sugar tends to clump. Add the salt.
Now switch to a spatula, wooden spoon, or your hand — no more whisking, or you’ll toughen the dough.
Gently bring the dough together.
Fold the flour into the butter mixture until it just starts forming a soft dough.
Avoid kneading — pâte sucrée should be handled like a shy creature: gently coaxed, not pushed around.
The dough will feel noticeably softer and more supple than your flaky pastries. That’s exactly right.
Turn it onto the counter and shape it with care.
Lightly dust your work surface if needed. Tip the dough out and gently press it together into a smooth, flat disk.
If you see streaks of butter or uneven patches, leave them — overmixing is the enemy here.
Wrap the dough and give it time to chill.
Wrap the disk tightly in clingfilm or beeswax wrap, making sure no air gets in.
Chill in the fridge for at least 30 minutes, though an hour is even better.
This rest firms the butter, hydrates the flour, and gives you a dough that rolls out cleanly without cracking.
Use gently, and always chilled.
When you’re ready to roll, work quickly — this dough softens faster than flaky pastry.
If it gets too soft at any point, just give it a quick chill and continue.
Wrap the dough tightly in clingfilm or beeswax wrap to prevent it from drying out — pâte sucrée dries faster than flaky pastry because of the sugar.
Store for up to 3 days in the fridge.
If the dough becomes very firm, let it rest at room temperature for about 5 minutes before rolling. Too soft = sticky, too hard = cracks. Find the sweet spot.
Wrap the dough well, label it, and store in a freezer-safe container or bag.
Freeze for up to 2 months.
Thaw in the refrigerator overnight before rolling.
If it feels crumbly after thawing (normal!), knead very gently just 2–3 times to bring it back together — pâte sucrée is forgiving.
Line your tart tin, trim the edges, prick the base with a fork, and wrap tightly.
Refrigerate for 24 hours, or freeze for up to 2 months.
Bake directly from frozen—just add a few extra minutes to your blind-bake time.
Fully cooled crusts can be stored at room temperature for 2 days in an airtight container.
Or refrigerate for 4–5 days if you prefer.
Re-crisp in a 180°C / 350°F oven for 5 minutes before filling.
Because it’s too cold — this dough firms up quickly.
Let it warm on the counter for 3–5 minutes, then roll again.
If it still cracks, gently press it back together. Pâte sucrée is more forgiving than flaky pastry.
Probably nothing. Pâte sucrée becomes soft very fast because of the sugar and creamed butter.
Use a very light dusting of flour, work quickly, and pop it back into the fridge for 5 minutes if it gets too warm.
Because sweet tarts and custards need a fully cooked, crisp shell.
Without blind baking, the crust would be pale, soft, or even undercooked under wet fillings. Blind baking ensures structure and flavour.
Shrinking happens when the dough is:
stretched into the pan
not chilled after shaping
overworked
Always lower the dough into the tin (never stretch), and chill for 20–30 minutes before baking.
Technically yes, but it will taste noticeably sweet and biscuit-like.
It’s best reserved for:
fruit tarts
custards
chocolate tarts
lemon curd
cream fillings
jam or frangipane pies
For savoury pies, stick with your flaky or enriched flaky pastries.

Recipe Categories
We lost so much.
Our pastures are destroyed, many of our old olive trees, the young orchards, the irrigation systems, our most important tools, water pumps, and power setup—either melted or destroyed.
Our food and hay stores, the fences, and many of the stable buildings are either damaged or lost entirely.
What took years to build was reduced to ash in a single afternoon.
Ready to Recharge and Enjoy Real Food in Nature?
Cook, connect, and grow in the heart of our regenerative farm.
Real food. Deep rest. Lifelong memories.
